
Share the application:
Application scan1664 is designed to help waiters and bartenders sum up multiple receipts, and tell the total billing amount to the guest.
No more painful summing up by heart in front of the guests, nor shameful typing in the amounts on the calculator. With this application, a waiter can easily come up with the total for several separate receipts that the guests have ordered and received, and want to pay in one transaction. Just scan each receipt, press a button and guests will hear the bill in their language.
Application uses the phone camera to scan the amounts on multiple receipts, sums them up and produces the total.
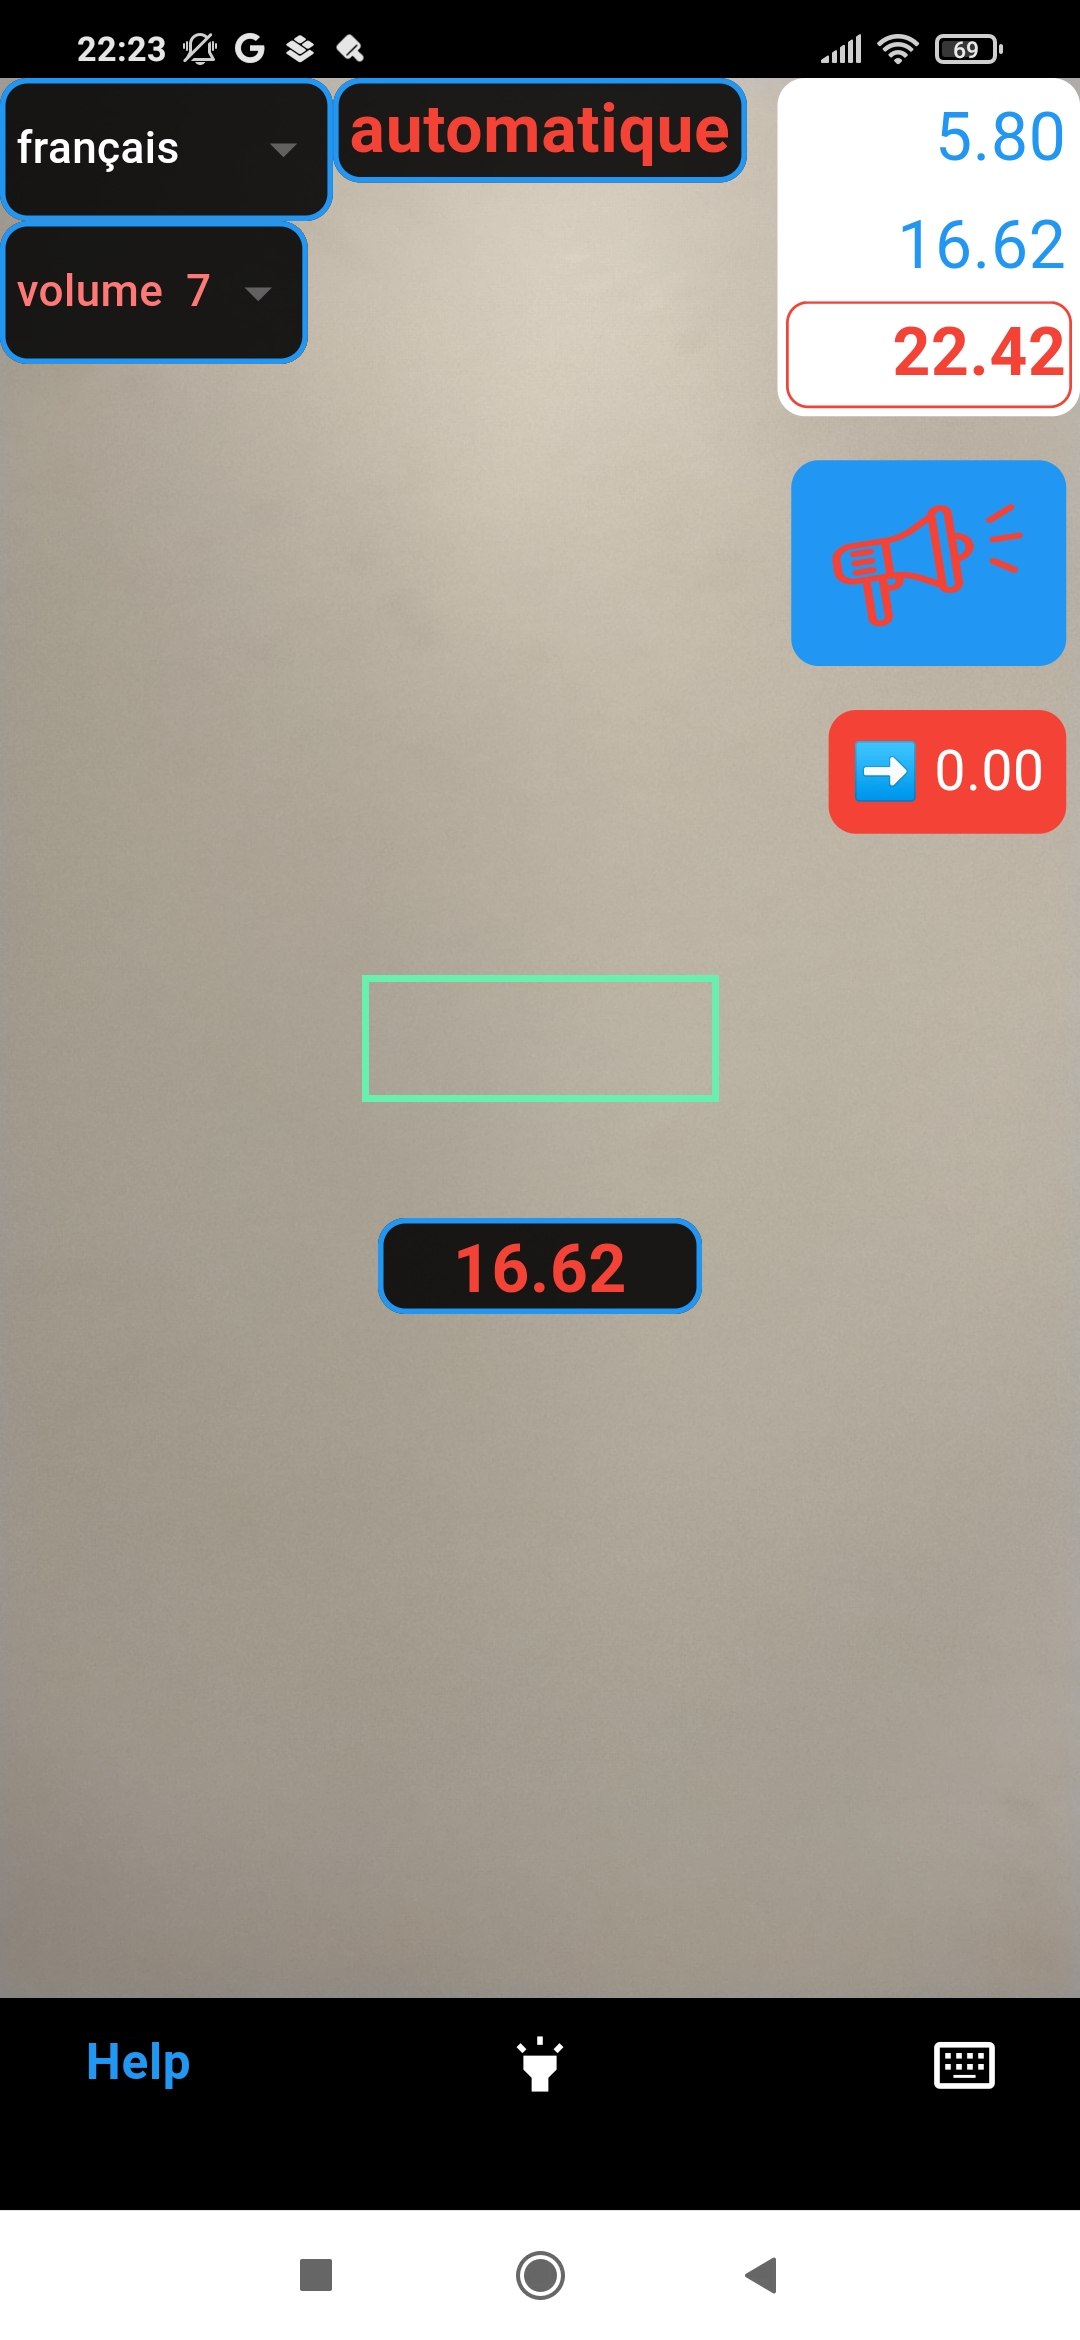
Items added to the sum are displayed in the top right section of the screen, along with current total. Below the total is the "speak out" button which, when tapped, initiates the read out of the current total in a language selected by the user.
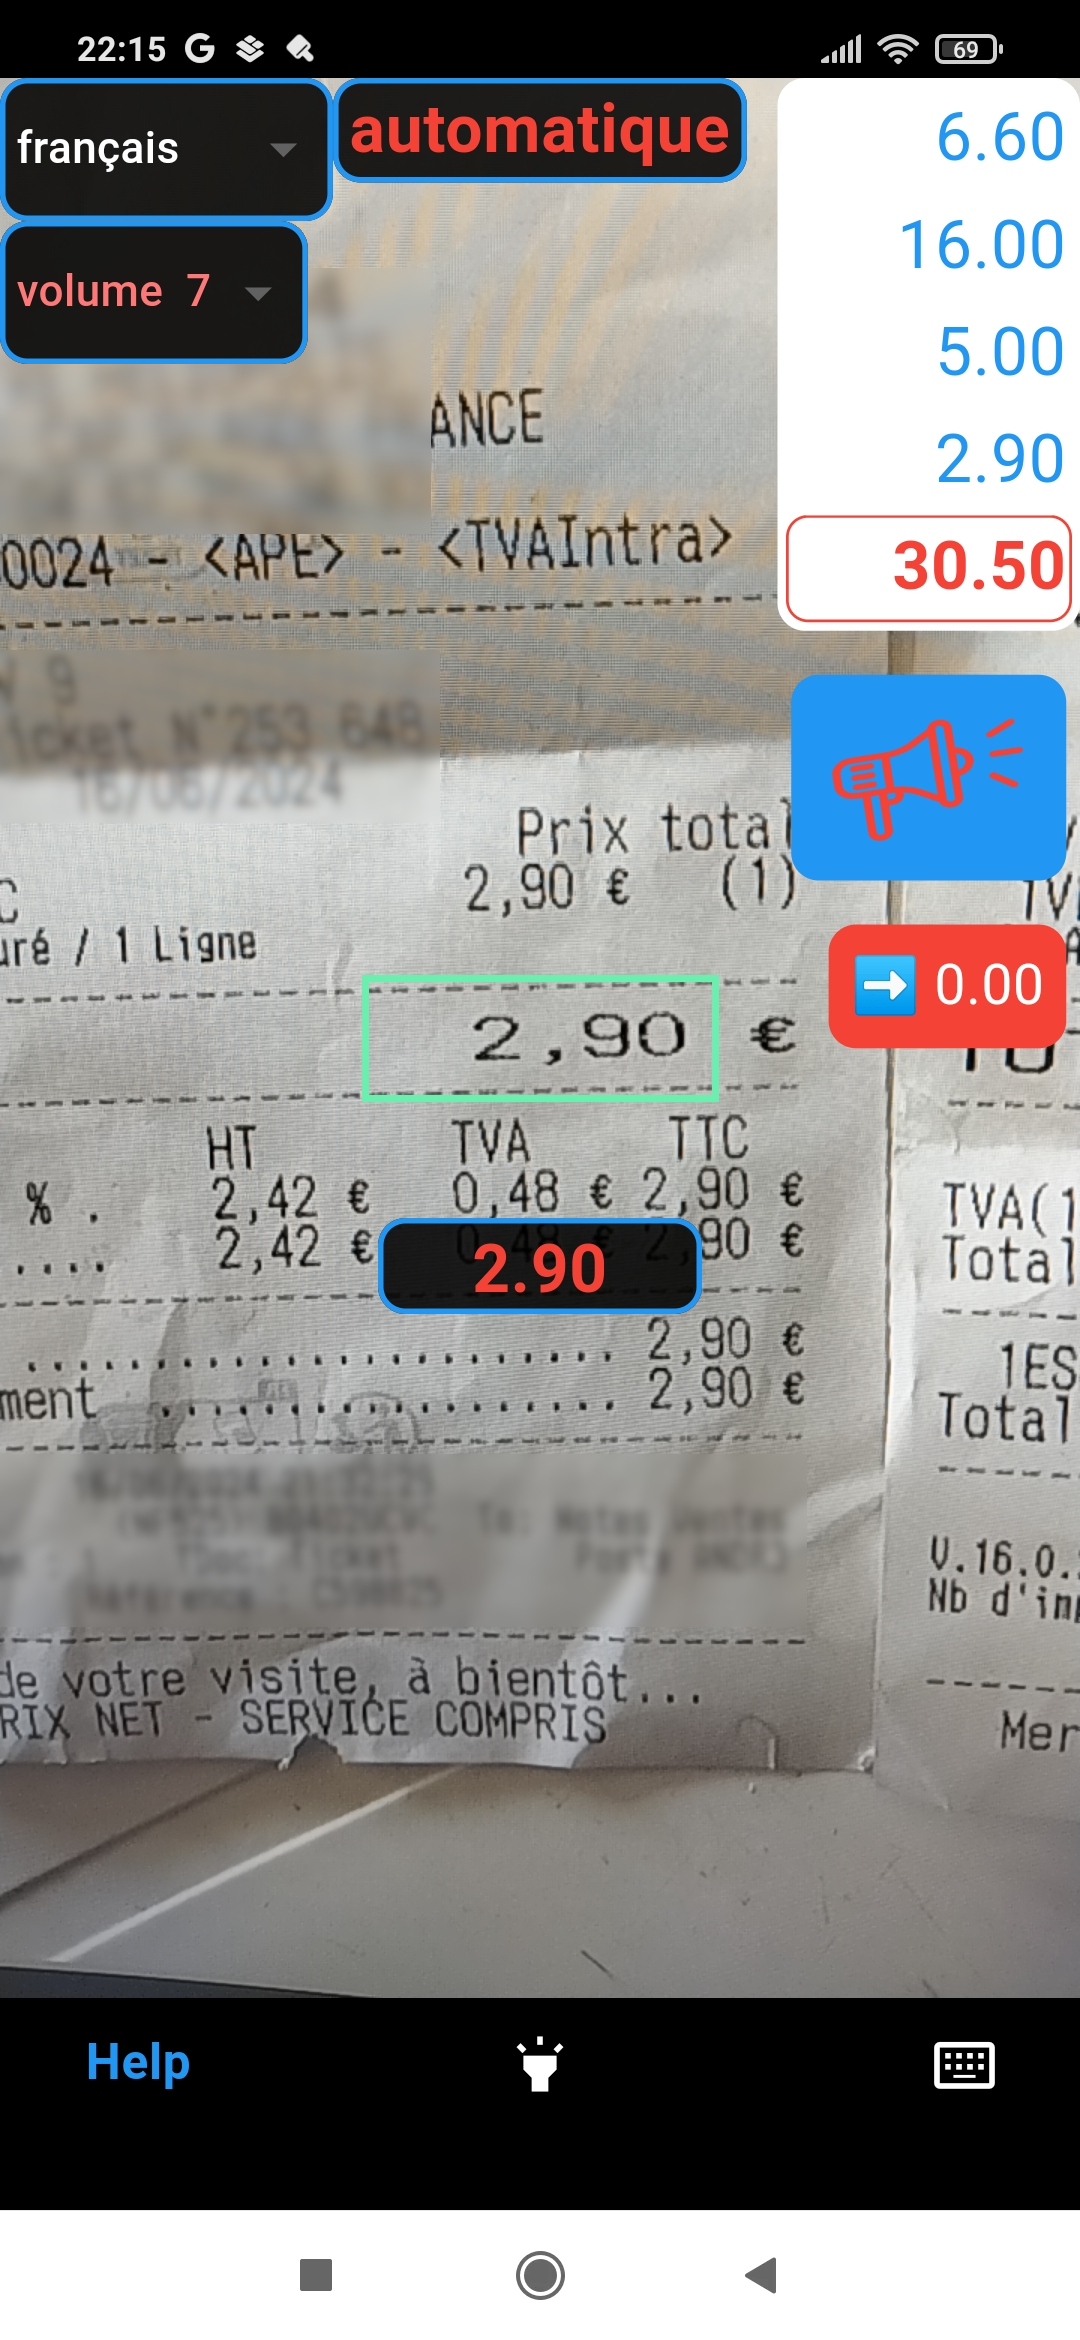
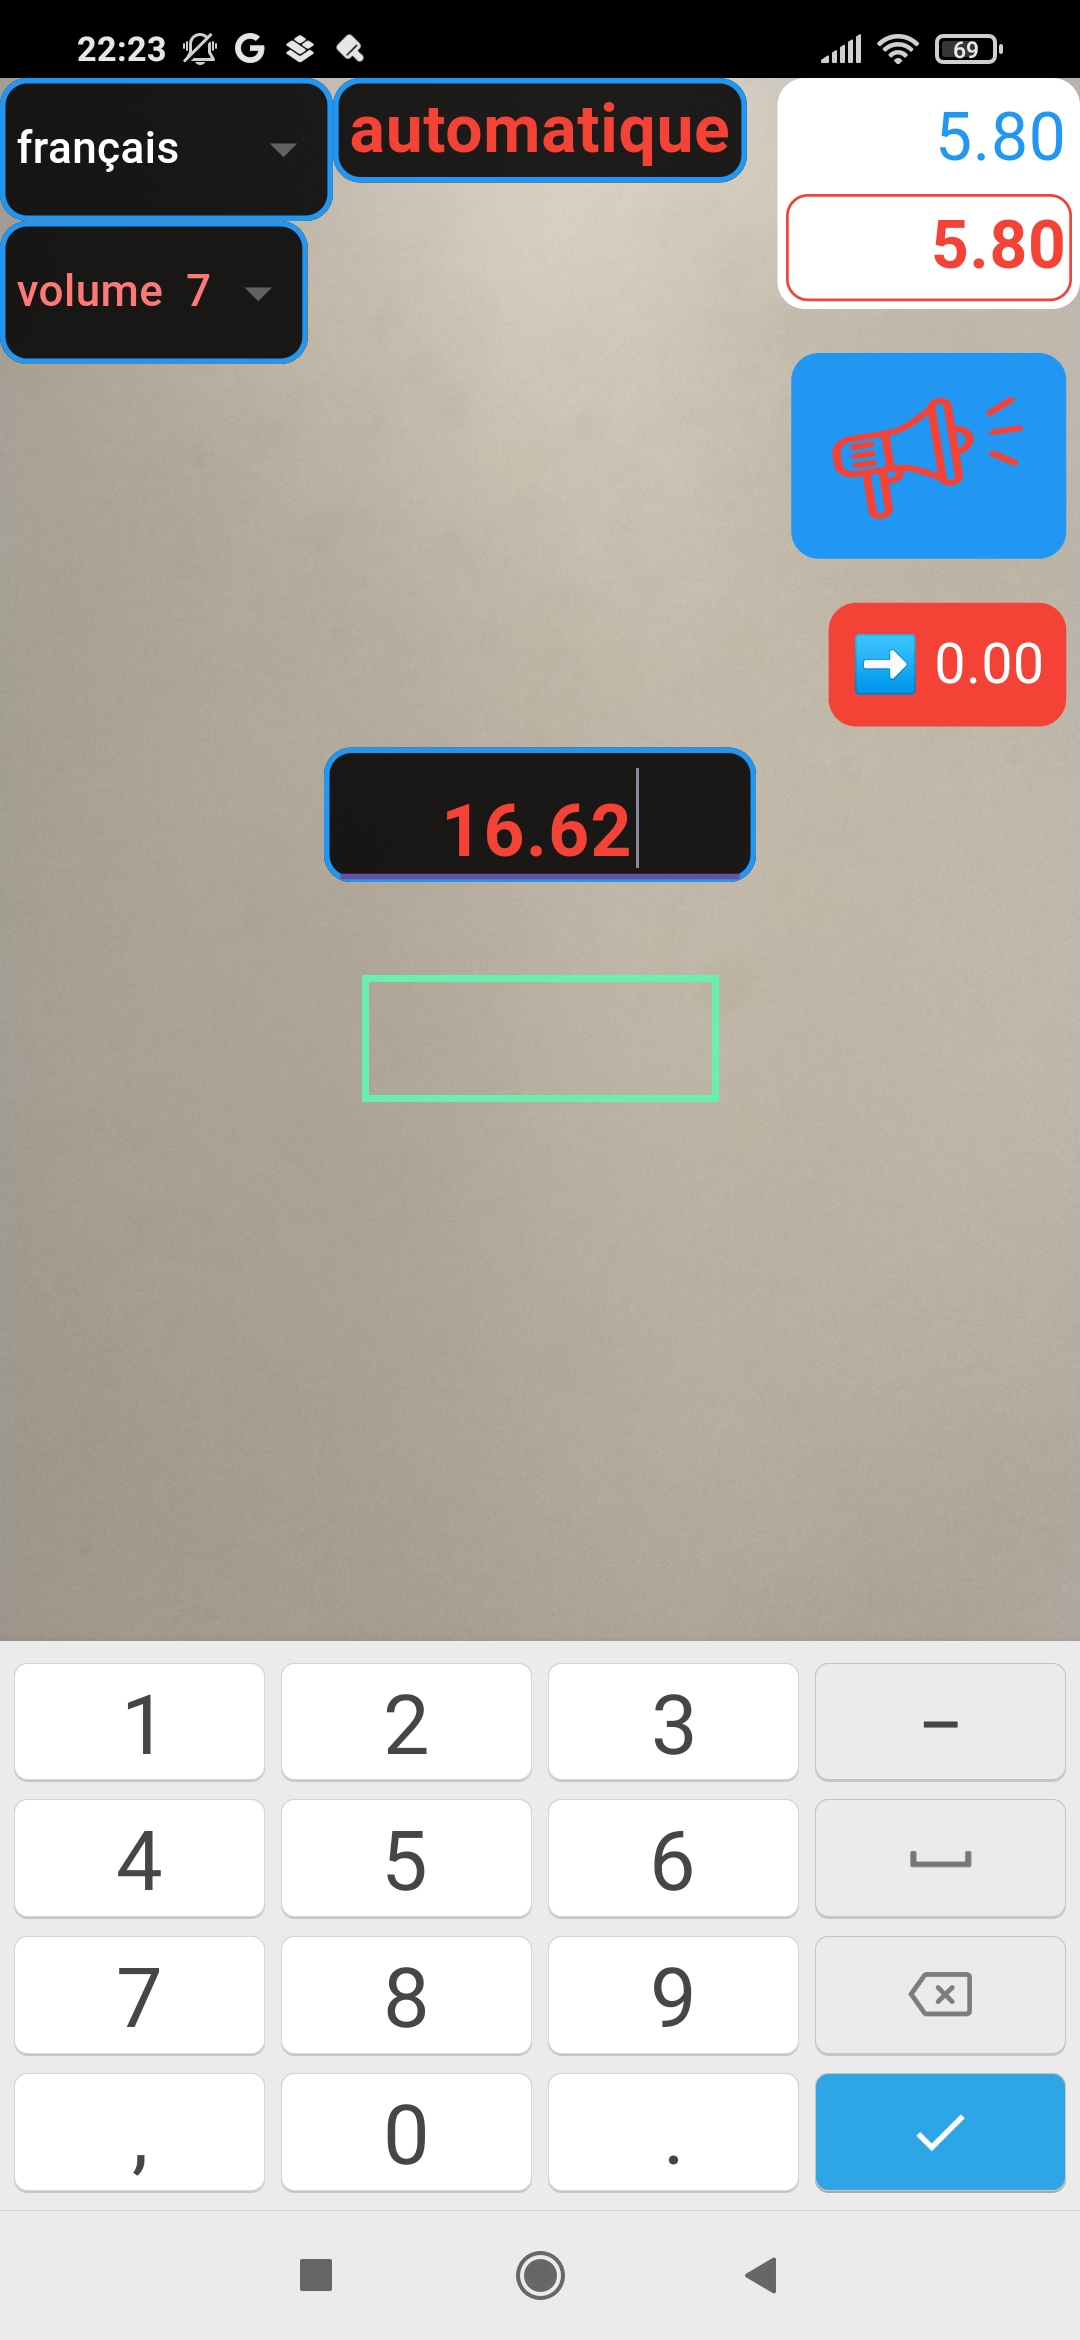
The screen shows what the front camera is capturing, much like the built in photo application. In the center of the screen a green rectangle is presented, which marks the scanning area. The goal is to focus the total payable amount of the receipt into that green rectangle. As soon as "the target is locked", the number will be scanned and added to the list of amounts.
The same process is repeated for all receipts that need to be summed up. After each scanning, new total is presented below the list of amounts.
Each scanned amount is announced (spoken out via phone speaker) using text to speech interface, so the waiter (and also the guests) may hear what is scanned.
Tapping on the button below the total (the blue button with a megaphone) speaks out the total.
As shown at the picture above, the amount that the user wants to scan should be brought into the green rectangle, and should be alone in it. No other digits or letters should be captured inside the rectangle. Furthermore, the application will accept only one, two or three digit numbers followed by a decimal point and two digits. If the Euro sign (€) closely follows the decimals - it will be accepted, if there is a space between the digits and € - this will not be valid input. Decimal point may actually be a point or a comma.
Such strict rules are in place so as to avoid false readings, since a receipt typically contains a lot of numbers, codes, tax rates etc.
Finally, the red button with "0.00" is used to clear the list and allow for restarting the scanning process for the next guest. It is activated by a double tap, to avoid unwanted clearing of the list by accidental single taps.
There are eleven items visible on the application screen, overlayed to the camera view.
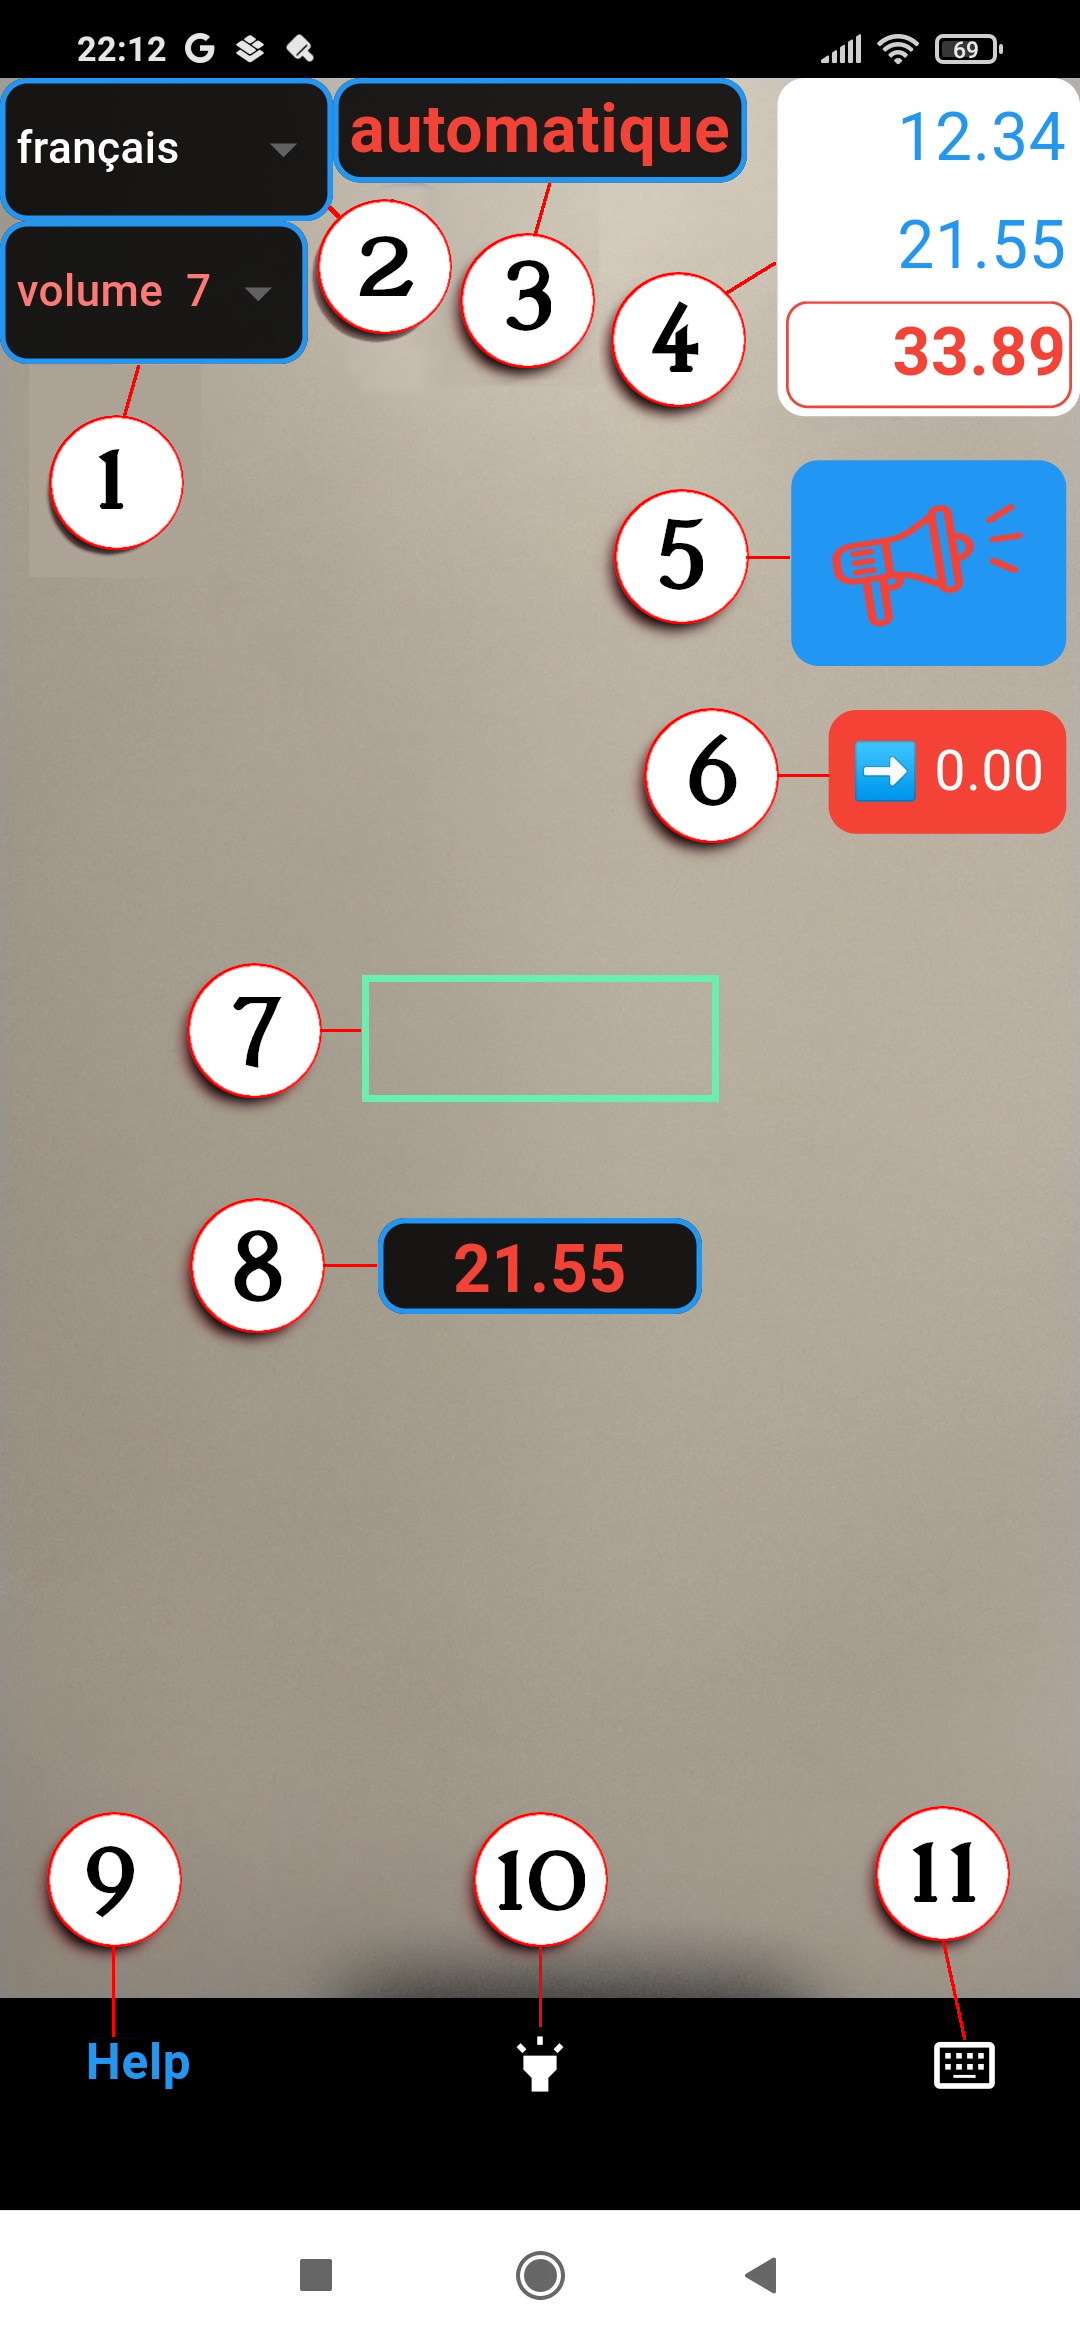
The description of each of presented items follows:
A dropdown list of available volume levels, from "silent" to maximum "volume 10". The maximum volume level is actually the volume level for playing media, as defined in the sound settings of the phone.
A dropdown list of available languages used to read out the scanned amounts and total.
The number readout is introduced in order to help the user of the application (waiter, bartender) to easily check if the number was scanned correctly, and also to provide audible feedback to the guest.
The first on the list is X, which means no readout. The second is français - French, which is where the first users of the application are located.
Language can be changed at any time during the application usage.
If nothing is spoken out for a selected language, it may have to be added to the list of active languages in the phone setup, under "Languanes" section.
Automatic mode continually attempts to scan what is in the green rectangle. This is handy, but may result in false readings. To prevent false readings, two simple safety measures are in place:
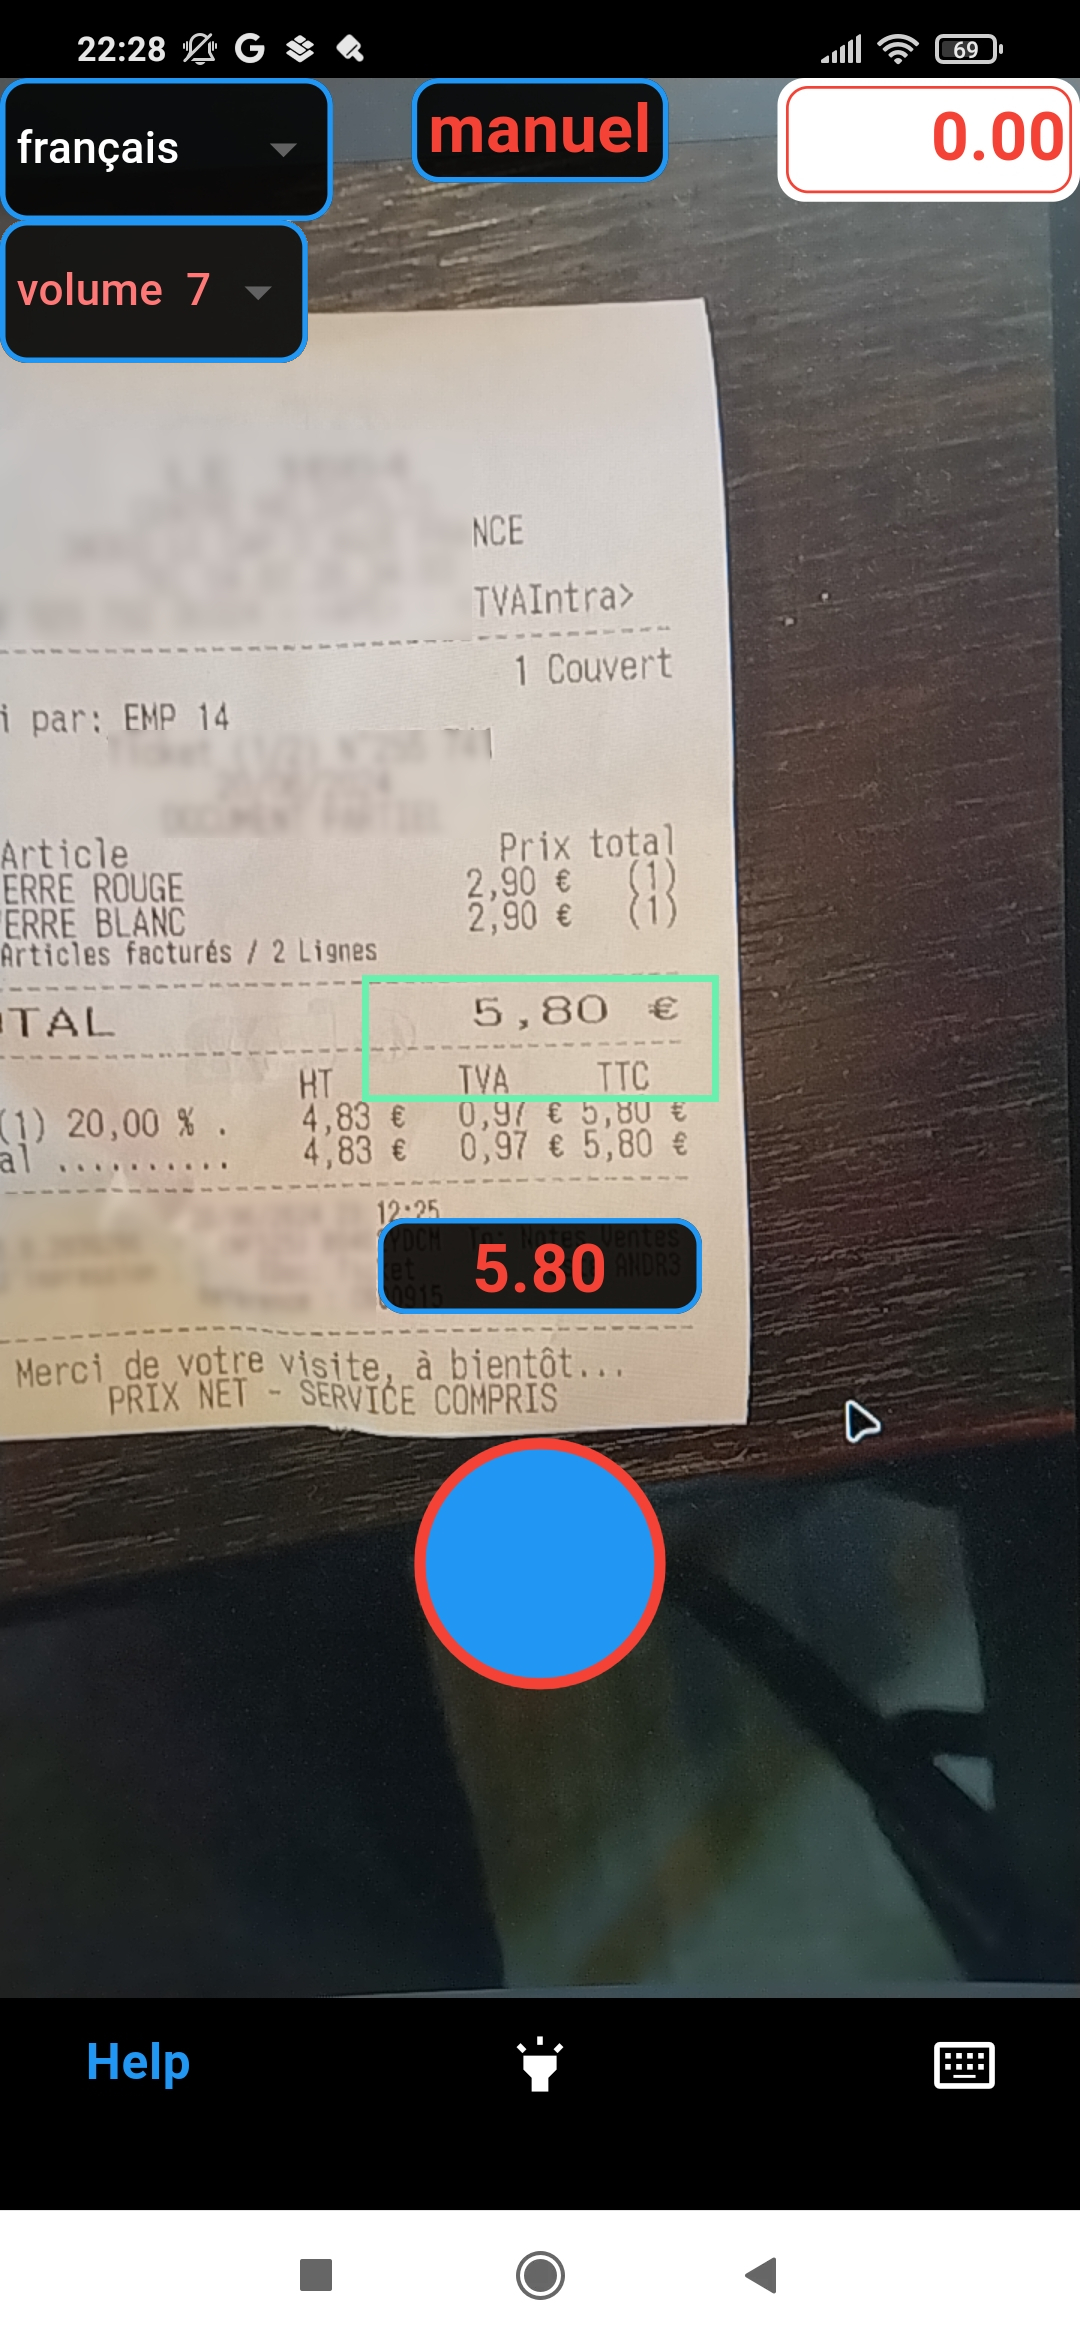
Manual mode presents a button which, when tapped, activates the scanning. It will remain active until a valid amount is scanned, but not longer than 10 seconds.
Manual scanning mode is described in more detail later in this document.
Upper right section of the screen displays amounts that are scanned (and/or entered manually - more details below). Amounts are displayed in blue, while the total is displayed at the bottom of the list, in red.
Each particular amount in the list may be duplicated, i.e added once more to the end of the list, by double tapping it. This is useful if there are multiple receipts with the same amount.
Each particular amount in the list may be deleted (removed from the list) by long tapping on it.
Taping, double tapping or long pressing the total has no effect.
Tapping the blue button below the total initiates the announcement of the total amount, in the currently selected language.
It may be tapped at any time. For example, if needed, after each scan of an amount.
Double tap on the red button with "0.00" clears the list of amounts. This allows for restarting the scanning process with the empty list.
It is activated by a double tap, to avoid unwanted clearing of the list by accidental single taps. Single tap displays a short message pointing the user towards the double tap.
Of the whole camera view that is presented on the screen, only the part covered by this rectangle gets scanned. The rectangle is here to help the user aim the camera to the right amount on the receipt.
This rectangle turns red when scanning is not active, in manual mode.
The black text area below the green rectangle displays the last amount that was scanned (and/or entered manually - more details below).
The last scanned amount is displayed as the last item in the list of amounts, but it is also displayed here, right below the scanning area, for easier checking if the amount was scanned correctly.
Double tap on the last scanned amount adds it to the list once more, which is handy if two or more receipts bear the same amount. For example, "five times two beers" is when five receipts are issued with the same amount. One of them needs to be scanned, while the rest may be "repeated" by means of a double tap.
Long tap on the last scanned amount removes it from the list of amounts. If wrong part of the receipt was aimed at, and a number that is not a total receipt amount was added to the list, it is easily rolled back by long tapping here. It works as long as the last amount in the list is the same as the last scanned amount, so other amounts cannot be deleted from here by mistake.
Tapping on the QR code icon displays this help page in a browser. A QR code which points out to this application in Play Store is presented at the top, so it can easily be shared with the next potential user nearby.
If the receipts need to be scanned in the dark (bars often have low lit terraces), a torch (LED lamp at the back of the phone) can be switched on and off by tapping on this button.
Tapping on the keyboard icon activates manual input feature. It is to be used in case the amount on one of the receipts is not scannable, for example if the receipt has been crumpled up or a drink has been spilled on it. This feature will be described below.
The application should not be kept active when not needed, since it continuously captures the camera input and tries to scan amounts, which consumes battery.
Exiting the application via standard Android back button (the right one of the three buttons on the bottom of the screen) will close the application. The next time it is activated, it will start with the empty list.
If the scanning of a certain number of receipts is in progress and needs to be paused for a while, the application can be minimized without clearing the amounts scanned up to this moment. This is done by tapping the middle of the three buttons on the bottom of the screen (the round one). When the application is activated again - it will continue with the present list of scanned amounts.
Manual mode presents a button which, when tapped, activates the scanning. It will remain active until a valid amount is scanned, but not longer than 10 seconds.
Upon activating manual mode, the button is red (off), and the rectangle is also red, as shown on the following picture. This indicate that scanning is not active.

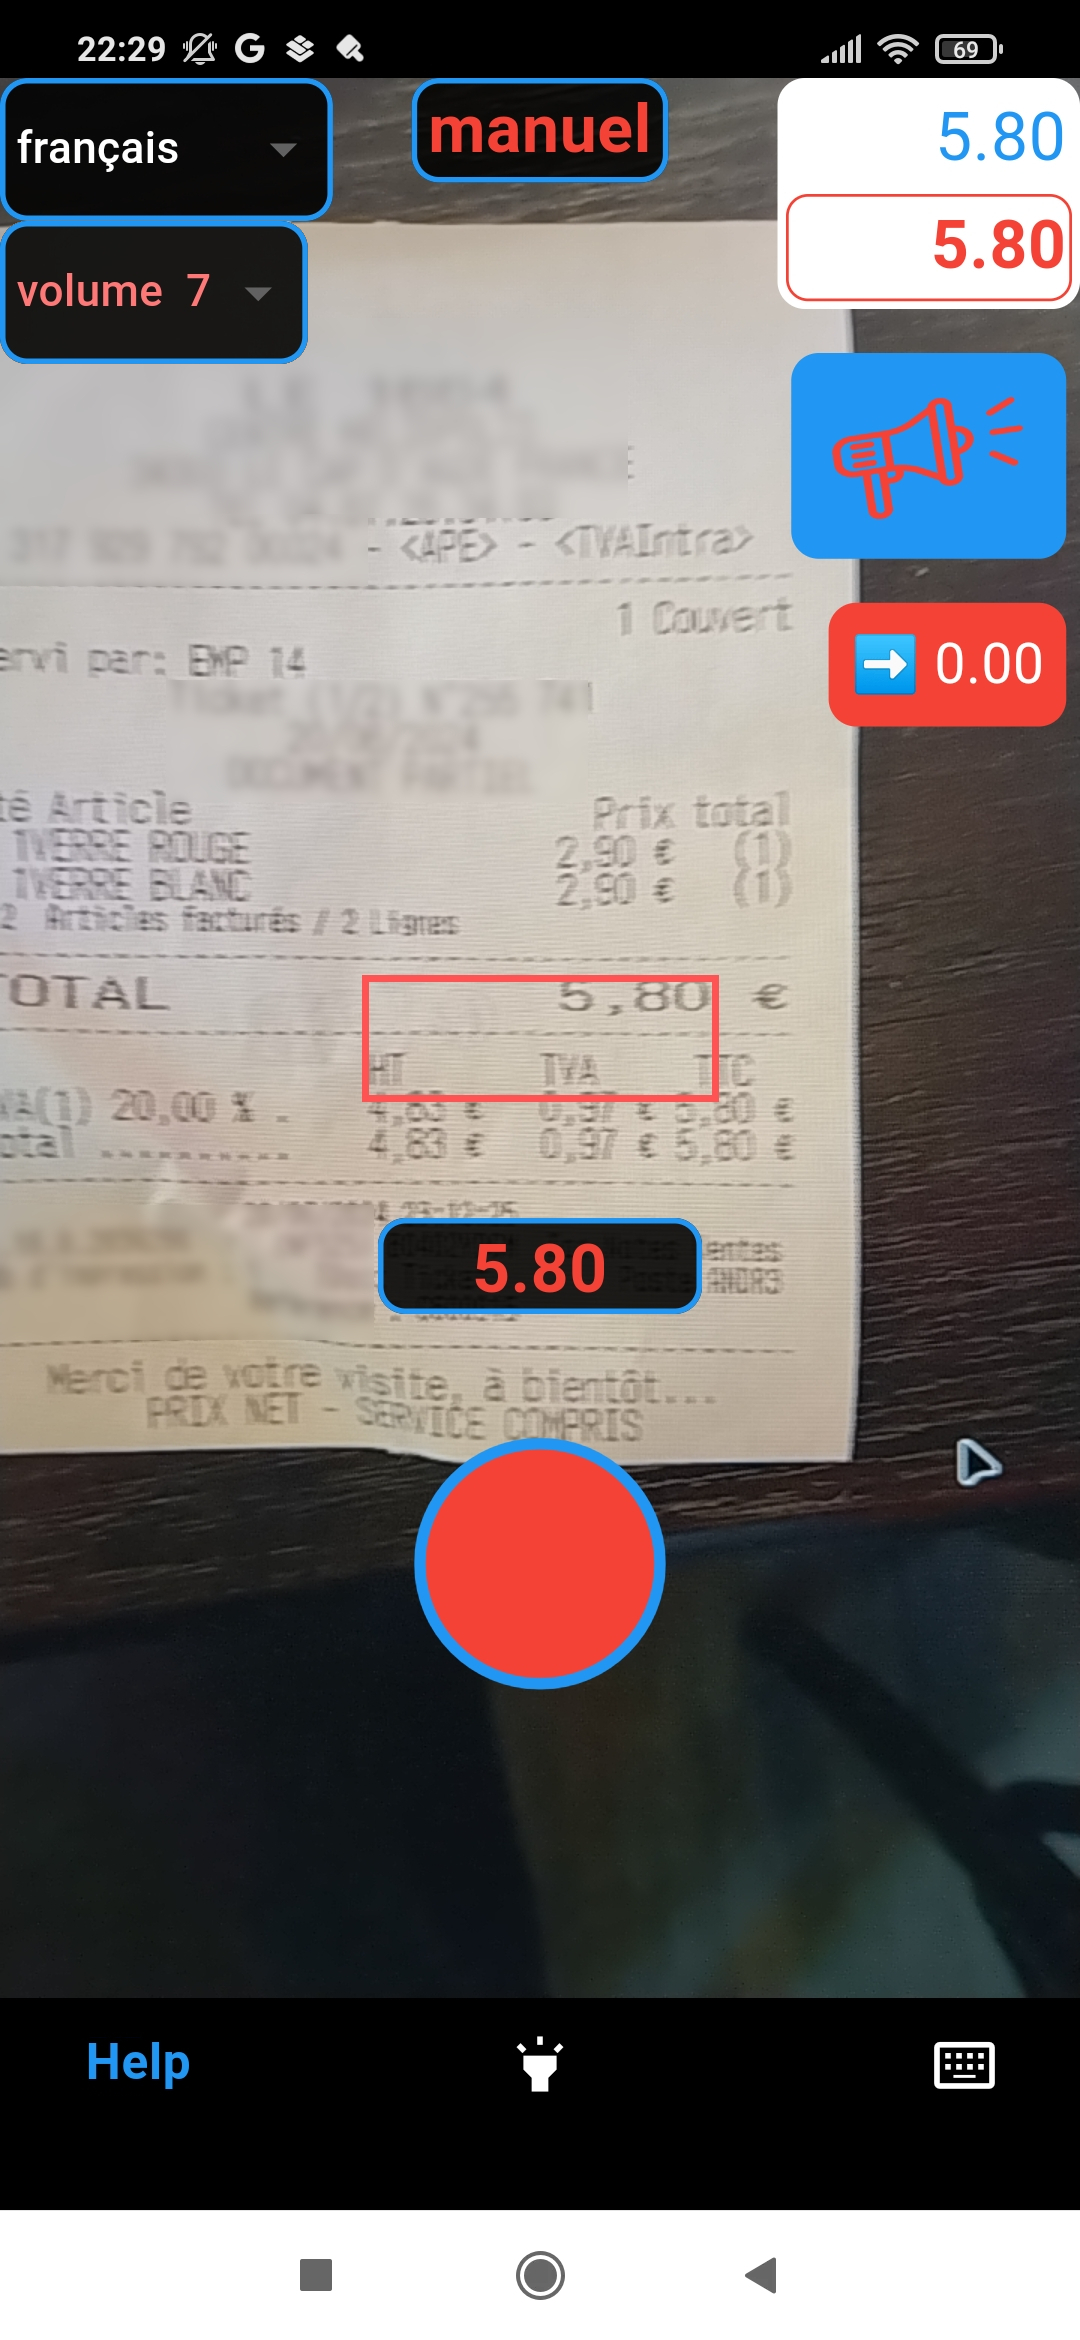
Tapping on the red button activates scanning. The button changes color to blue, rectangle becomes green again, and scanning is activated.
If, in the next 10 seconds, a valid amount is framed into a green rectangle, it will be scanned and added to the list. Scanning will then be deactivated, button and rectangle going back to red.
Tapping on the red button will start the new scanning.
Mode can be switched between automatic and manual at any time.
If some of the receipts are damaged and the amounts on them can not be scanned correctly, manual input is used to enter the amounts via keyboard. It is activated by tapping on the keyboard icon.
In manual input mode the last scanned amount (below the scanning area) is not displayed. Instead, a new field for manual input is displayed above the scanning area, which will hold the number that is entered manually.
This field is set up to accept a number in the format described in section "Aiming at the desired amount": one, two or three digits followed by a decimal point and two decimals. Only numbers are entered, decimal point is always set before the last two entered digits. This is how mobile POS terminals for accepting the credit card payments work, so the users should be familiar with this kind of input.
At most five digits are kept, if more are entered - the last five will remain.
The input should be confirmed by tapping the check mark on the keyboard. Upon confirming, the display switches back to regular scanning mode. Amount that was entered is added to the list of amounts, and is displayed in the "Last scanned amount" field, as if it was scanned.
Keyboard input may be canceled at any time by tapping anywhere out of the keyboard and text input field.